Troubleshooting custom imports
Tip: This feature is available with Powerpay Plus.
There are several factors that can cause a custom import to fail. The most common import errors are provided. Contact your Customer Support Team if your concern has not been addressed here.
Error #1

- To add a template, follow the link in the error message or go to the Custom Import Setup page.

Error #2

- Confirm you have selected the correct template.
- Review the mapping of the Custom Import Fields to the Powerpay Fields in your template. Adjust as required. Go to the Custom Import Setup page.
- Review all amendments made to the template since your last successful import.
- Confirm the presentation of information.
- Each column represents the type of data to import. For example, an earning amount, an hour types or a distribution code.
- Each row of information represents one type of employee data to import. The value is inserted under the respective column.
- To include multiple updates for an employee, record one row per update type. A test example is displayed.
Tip: Refer to the Custom Import Client User Guide for template samples.
Error #3
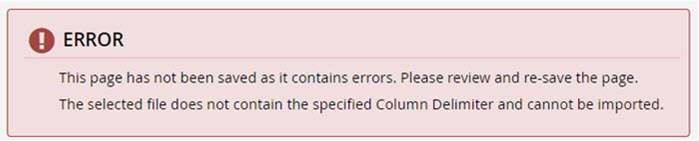
-
Review the Column Delimiter displayed in your import file to ensure it matches the set-up for the selected template. The example displayed does not match.
Error #4
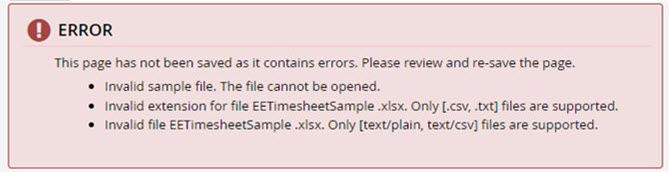
Confirm your import file was saved as a .CSV file.
- If yes,
- Open the .CSV file, using Textpad or Notepad and search for hidden special characters. For example, &, @, #, $, %, etc.
- Resave the Excel file without the special characters and try again.
- If no, save as a .CSV file and try again.
- If unsure, enable file extension view.
- Go to Start Menu > Control Panel > Folder Options.
- Select the View tab.
- In Advanced Settings > Files and Folders:
- Unselect Hide extensions for known file types.
- Scroll down to Hidden files and folders and select Show hidden files, folders and drives.
Tip: Confirm these settings if you have changed computers, had a computer reset or your computer settings were modified recently.