Approving daily hours in Self Service (Managers)
When hourly employees submit their daily hours, an email is sent to their manager for review and approval. As a manager your options are to approve or deny the hours. If the hours are denied, employees can submit new hours.
-
Managers must be Active employees to approve or deny a timesheet. Managers in an On Leave or Terminated status cannot view, approve or deny an employee’s timesheet.
-
You can only approve or deny hours for Active hourly employees. Hours cannot be approved for salaried, On Leave or Terminated employees.
-
Entering, editing, approving and denying Daily Hours in Self Service may be restricted depending on the state of the payroll and the deadline for submitting changes.
Tip: Do not approve hours until the end of the pay period.
Important: If an employee submits their hours in error prior to the end of the period, and the hours are approved, the employee is locked out of their timesheet for the remainder of the current pay period. To enter the hours for the remainder of the current pay period, the Payroll Admin must enter the hours on the Employee Timesheet in Powerpay.
-
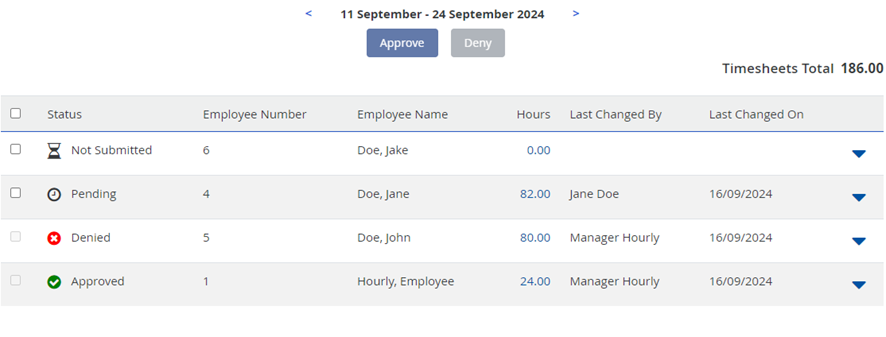
Go to the My Team's Timesheet page.
 or click the Timesheet icon on the homepage.
Note: Selecting the Timesheet icon as an hourly manager will redirect the user to the My Timesheet page and will redirect a salaried manager to the My Team’s Timesheet page.
The My Team’s Timesheet displays information for the current pay period. The information includes:
-
All active hourly employees who report to you.
-
The status for each employee’s hours:
-
Green checkmark – Approved
-
Red cross – Denied
-
Clock – Pending. Hours submitted by the employee for approval.
-
Hourglass – Not Submitted. Hours entered and saved by the employee on their timesheet but not submitted.
-
-
The total number of hours submitted by each employee for the pay period.
-
The date the records were last updated.
-
The total number of hours submitted for all the employees who report to you.
Note: Using the back arrow, you can go back up to the pay period when Daily Hours was enabled for your payroll. Using the forward arrow, you can navigate up to one pay period in the future.
Note: Approved and Denied entries are disabled.
-
-
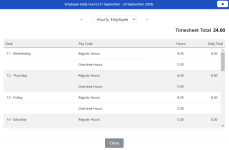
Click on the down arrow at the right side of the grid to open a detailed list of the hours submitted for the employee.
The list includes:
-
The hours entered for each day in the pay period including Regular Hours, Overtime Hours, and any time off requests (pending and approved) when Time Off Request functionality is enabled for your payroll.
-
The total number of hours submitted for the pay period displays in the top right corner.
-
-
Use the employee dropdown arrow at the top of the page to select a different employee.
-
After reviewing each employee’s hours, click Close.
-
Select the checkbox to the left of the employee’s name for each employee’s hours to approve and click the Approve button at the top of the page.
Approved hours are disabled on the employee’s timesheet in Self Service, and cannot be resubmitted.
-
Select the checkbox to the left of the employee’s name for each employee’s hours to deny and click the Deny button at the top of the page.
Denied hours are enabled on the employee’s timesheet in Self Service for the employee to update and resubmit.
Note: No action is taken if you approve an empty timesheet (0.00 hours).