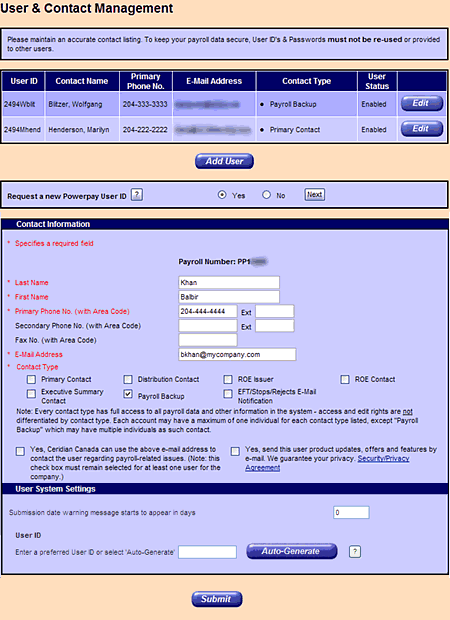
To Add a User or Contact
- Click the Add User button. (This button will only appear if you have not yet reached the maximum number of users allowed for your payroll. If you require more users, contact Ceridian’s Customer Care Team.)
- Beside “Request a new Powerpay User ID”:
- OPTION 1: click the Yes radio button if you wish to add a User,
OR
- OPTION 2: click the No radio button if you wish to add a Contact.
- Click the Next button.
- The Contact Information section of the screen will appear. On this section, make sure to complete all required fields.
Note: These fields appear in red with an * (asterisk).
- Any User or Contact can be assigned to any, or all, of the following Contact Types. However, each Contact Type can only be assigned to one User or Contact except Payroll Backup, which can be assigned to more than one person.
- Primary Contact – first point of contact for payroll and receives messages from Ceridian.
- Distribution Contact – receives the payroll package from Ceridian.
- ROE Contact – responds to questions about why an ROE was issued.
- ROE Issuer Contact – responds to questions regarding the date printed on the ROE form.
- Executive Summary Report Contact – receives the Executive Summary Report.
- Backup – a secondary contact for all payroll related inquiries.
- FOR USERS ONLY:
- At least one User must select the “Yes, Ceridian can use the above e-mail address to contact the user regarding payroll-related issues” checkbox.
- The section User System Settings enables users to specify the number o days, prior to the submission date, that warnings should display. Acceptable values for this field vary by pay frequency:
| Pay Frequency |
Acceptable Values |
| Weekly |
0-7 |
| Bi-weekly |
0-14 |
| Semi-monthly |
0-15 |
| Monthly |
0-30 |
- Assign a User ID by:
- OPTION 1: typing a new User ID into the text box provided,
OR
- OPTION 2: clicking the Auto-Generate button which will populate the User ID text box automatically.
Note: User IDs must be between 6 and 14 characters long and contain only letters and/or numbers.
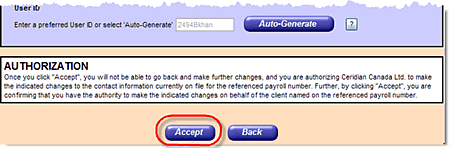
- Click the Submit button. An Authorization notice will appear.
- Click the Accept button to accept the authorization.
Note: Users will appear in the summary list on this page, but Contacts will not.

If you have just created a new User, Powerpay will automatically send an email to that person with their User ID and temporary Reset Password.
|