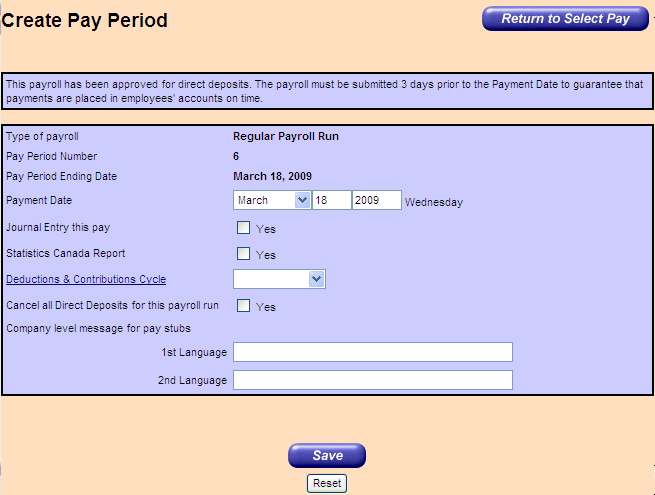
1. Verify that the Pay Period Ending Date is correct.
2. Enter the current Payment Date.
3. Select Journal Entry this Pay to receive a journal entry if this report is required with this payroll run. A journal entry contains all your General Ledger data from the time the last Journal Entry was requested, to the present. In general, you will request a Journal Entry either every pay or at the end of the month.
Click here to learn about the
Journal Entry checkbox.
4. Select Statistics Canada Report to receive this report. A Statistics Canada report contains all data from the time of the last report entry, to the entries processed on this pay period. It contains all the information required for reporting purposes by Statistics Canada.If you have been selected to participate in the Statistics Canada Business Payroll Survey, you are required by law to produce the report at the end of every month. You must sign and submit this report to Statistics Canada after receiving it from Ceridian Canada in your payroll package.
In general, you will request a Statistics Canada report on the last pay period of the month. (You must consistently choose either the Pay Period Ending Date or the Payment Date when considering which pay is the last pay period of the month).
Click here to learn about the Statistics Canada checkbox.
5. Select the Deductions and Contributions Cycle. (Cycle 1 = 1st pay of the month, Cycle 2 = 2nd pay of the month, etc). This cycle represents a group of deductions and contributions, which can be applied to a payroll run.
6. Select the Cancel all Direct Deposits for this payroll run checkbox to override all employees' direct deposits and transfers. All employees will then receive cheques for this payroll run only. This feature is often used (a) to produce bonus cheques for employees, or (b) if there is insufficient time to process the payroll before the cheque date. When you click on this check box to place a check mark in it, you are telling Ceridian that you want your employees to receive paper cheques instead of direct deposits for their payments.
If this check box is selected, it means that you have indicated to Ceridian Canada that you will not be making direct deposits to employees' bank accounts.
Click here to learn about the Direct Deposit Cancellation options if your payroll has Distributed Delivery / Transfer Payments.
7. Use the Company level message for pay stubs field to enter a message, which will print on all employees' pay stubs for this payroll run.
8. Click Save.
9. Once your new pay period is saved, click the Return to Select Pay button to return to the original screen.
On the Select Pay screen below, note that the Regular run for Pay Period Number 10 now displays. This means you can enter payroll data for that pay period.

10. Click the Enter link at the far right side of this pay period’s row to begin entering data. The Rapid Entry screen opens and the Payroll and Process tabs become accessible.
The Company and Reports tabs are available at all times, regardless of pay period status.
Important! You will have to click the Enter link for a pay period EVERY TIME you log into Powerpay and want to add or change employee or timesheet data.
|
